The Tails operating system (OS) is a free portable operating system that helps its users avoid surveillance, censorship, advertising, and viruses. Tails is designed for privacy protection.
The surveillance, censorship, virus, and privacy protection features of Tails are very important, but one thing that makes Tails interesting is its portability. This means that you can flash the Tails operating system into a USB flash drive and use it on any working computer.
Therefore, if you don’t have a computer, please try and have the Tail operating system on a USB flash drive. This is important because, with that, you can borrow your friend’s computer and use it without having to leave a trace on it or save anything inside it, and you don’t even have to log in to their computer before using it.
Even though you have a computer, Tails is still an important operating system you need for security reasons.
How to Get Tails Operating System
To get tails working, you will need only three things. One is a USB flash drive. A 16GB+ flash drive will be nice.
The second thing you will need is an internet-enabled computer. You will need the computer to download Tails and flash it into a USB flash drive.
The third thing you will need is an app that is used to create a bootable USB drive. This is what you will use to flash the tail operating system into the flash drive. Examples of such apps are Rufus and BalenaEtcher.
Steps to Install Tails Operating System
1. Download the Tails imaging file into a computer.
Make sure you get the right Tails for the operating system you are using for the download. For instance, if you are downloading using a Windows computer, download the image file for Windows. Also, remember to take note of the location where the downloaded file is saved on your computer.
Remember, Tails is free to download. All you have to do is visit the Tails official website.
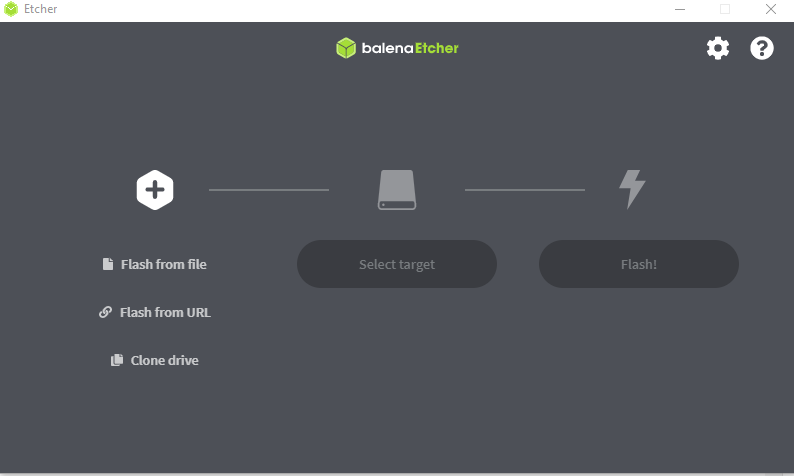
2. Download Rufus or BalenaEtcher
On the same computer where you downloaded Tails, download and install either of the two bootable USB flash drive creator apps. I recommend you download balenaEtcher. Remember to download the right version for the computer you are using. Then open the app ready for flashing.
3. Insert Your USB Flash Drive into the Computer and Flash the Tails Operating System Into It.
This is very simple to do. Therefore, take it one step at a time. Insert the USB flash drive you want to flash the OS into it in the computer you installed Tails and balenaEtcher.
Then after that, the first thing to do is to select the Tails file you want to flash into the drive by clicking on Select Image or Flash from file. Then browse on your computer until you find where the Tails image file you downloaded is saved and select it.
After that, click on Select drive or Select target. This is a very critical step. Make sure you selected the flash drive you inserted into the computer and not your hard disk.
Then click on Flash. This will flash the Tails image into the USB flash drive. Wait for some minutes for the flash to complete and then close BalenaEtcher and remove the flash.
Suggested Post: How to Turn on Disk Encryption in Windows 10 Home Edition
How to Start Tails From the Bootable USB Flash Drive On Your Windows or Mac
You now have the Tails operating system you can use on any computer without a trace or causing any change on the computer. But before you start using Tails, there is still one task you will have to perform.
Therefore, to start Tails on any computer, you will have to make the computer boot from a USB flash drive. Relax; this is also easy to do.
For Mac:
If you are using a Mac, simply shut down the computer. Then plug in the USB flash drive your Tails is installed in. Then start your computer by pressing the power button and immediately press and hold the Option key (Alt key) on the keyboard until a list of possible startup disks appears.
Select the USB stick option and press Enter. The USB stick option appears as an external hard disk and might be labelled EFI Boot or Windows, as shown in the image below:
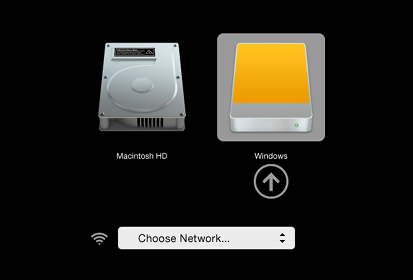
Then wait for your Tails operating system to boot. If Tails fails to boot on Mac with a security error message. Then put your boot security settings to no security to allow your Mac to boot from an external drive. You can find steps to do that here.
Suggested Post: How to Turn Off Windows 10 Update Permanently
For Windows:
Make sure the computer is turned off. Then plug in the USB flash drive you installed Tails on and press the power button. Start tapping the boot menu key on the keyboard immediately. Then a boot menu will appear. Select Removable Devices or USB and press the Enter key on the keyboard to start Tails.
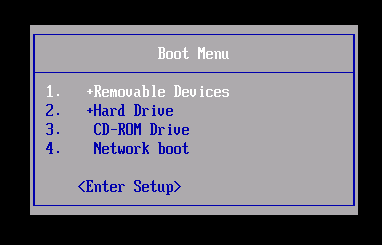
Remember, every computer has its own boot menu key. For Hp computers, it is F9. Toshiba, Lenovo, Dell, Huawei, Acer, etc. have it as F12. For others, it might be the Esc key or F11.
In addition, to avoid losing track of where you stopped after removing the USB flash drive from the computer or shutting down Tails. Make sure you put your tails on persistent storage. Check Tail’s official website on how to do that.


Your article is very useful and good in writing so thanks for sharing your views .
with us.