
If you have been following my post series on web development, you will understand that we made mention in our last post that content placed in-between the body tag are the ones that are displayed on the browser viewport.
In this post, we are going to be looking at those html5 elements that are used within the body tag that helps in our website presentation or look.
Before you continue reading you can check our previously discussed topics on web development and Html quick guide.
In our previous post, we divided Html tags into two types, the container and empty tags.
Tags or Elements we use within the body tag can also be categorized into two whether they are either empty or container tags. The two categories are;
The Block-Level Elements or tags
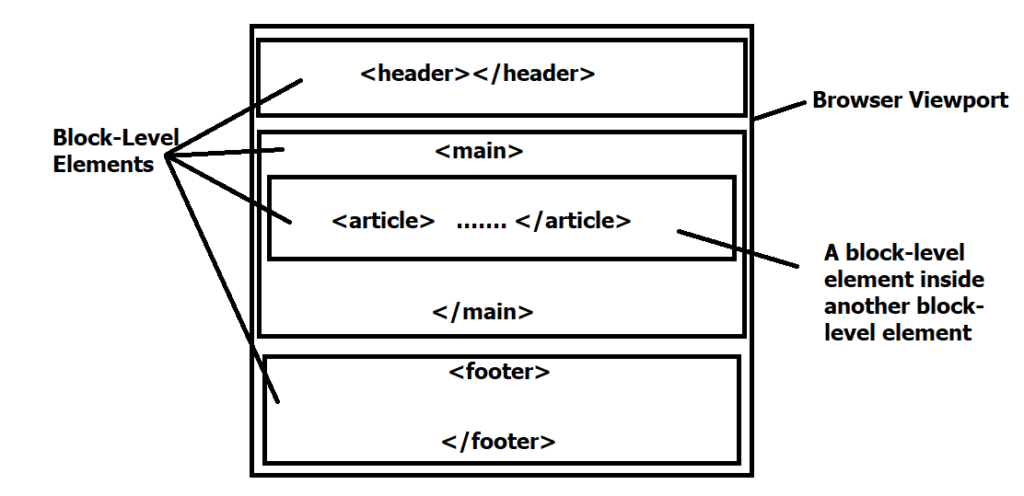
These are elements that takes the full width of the body tag and they have an inbuilt line break capacity that makes them able to start a new line by default. Examples are <div>, <header>, <article>, <section>, <address>, <figure>, <form>, <main>, <ul>, <aside>, <p>, <h1>-<h6>, <hr>, <blockquote> etc.
What this means is that except if a block-level element is styled with CSS to appear side by side on the page they will take the full width of the viewport and start in a new line by default when created. See the illustration below;
The inline Elements or tags
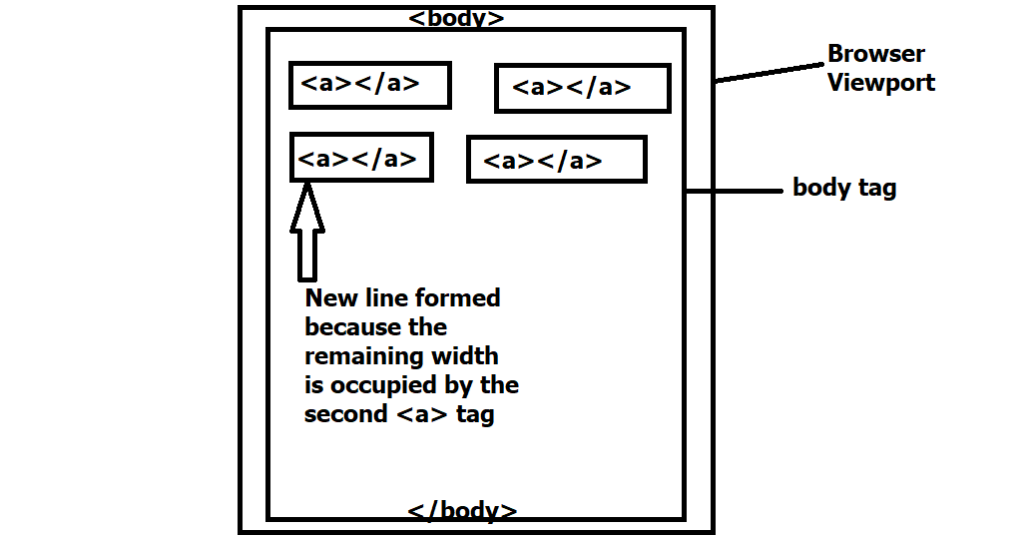
These elements do not take the full width of the browser viewport or start a new line by default when created. They will appear side by side inside the element they are nested in or in the body tag until there is no other space for them to occupy on the same line before they start a new line. See the illustration below; examples are the anchor tag <a>, span tag, input tag etc
Semantic Html
Before we start adding some content to our html body tag to improve our webpage look or presentation. We will need to look at another very important term; semantic html.
Semantic Html is simply the use of html markup to add to the semantics or meaning of the content displayed on our webpage. The tags or element we use to achieve this goal is called Semantic Elements.
Semantic elements are elements that clearly describes its meaning to both the browser and the developer. They make it possible that by just seeing a tag or hearing its name, you can tell without asking the meaning or purpose of the content it contains. Examples of semantic elements are; <form>, <table>, <title> etc.
Html5 introduced some other new semantic elements like; <article>,<aside> ,<details> ,<figcaption>, <figure>, <footer>, <header>, <main>, <nav> , <section>, <summary>, <time> etc.
The Html Body tag Content
To continue adding tags to our previous html page, that is the index.html file we created in our previous post. We will use the semantic elements we discussed above to structure the page.
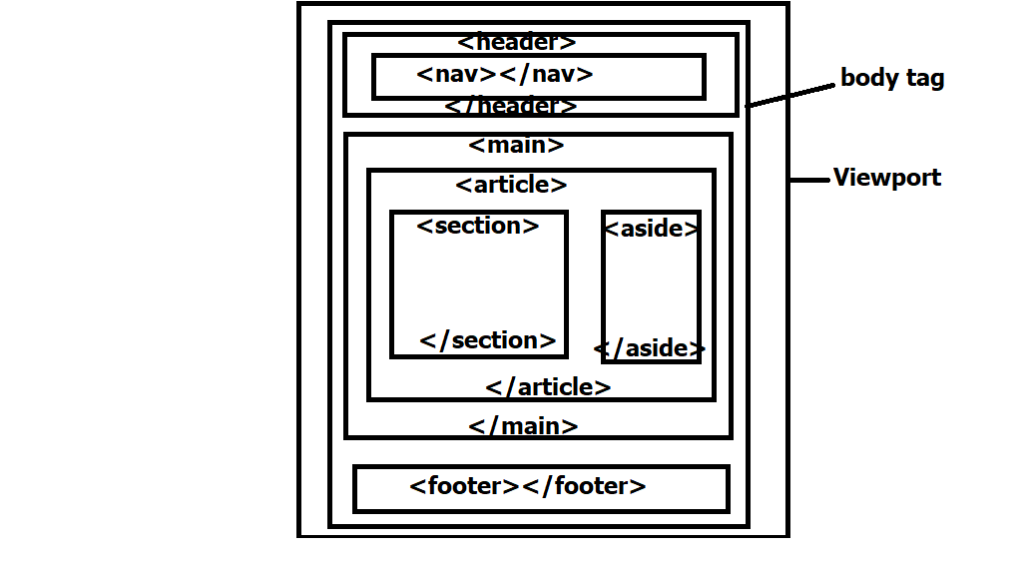
Inside the html body tag, we will include the <header> tag to demarcate the head part of our page. We will also add the <main> tag to markup the main content of our page and finally the <footer> tag to set aside the bottom part of the page.
Our html index.html file will now look like this;
<! DOCTYPE html>
<html>
<head>
<title> the page title </title>
<meta name=”description” content=”first Web page tutorials”>
<meta name=”keywords” content=”HTML,CSS,XML,JavaScript”>
<meta name=”author” content=”Obinna Jude “>
<meta name=”viewport” content=”width=device-width, initial-scale=1.0″>
</head>
<body>
<header>
<!– this holds the header for the document –>
</header>
<main>
<!—this holds the main content for the document –>
</main>
<footer>
<!– this shows the footer for the document –>
</footer>
</body>
</html>
The Html Header Element
The Header tag does not only specify the header for a document, but also for a section. This implies that we can have more than one header tag in an html document. For instance, we can use header tag to separate the heading section of an article in our document main content as shown below.
<! DOCTYPE html>
<html>
<body>
<article>
<header>
<h1> HTML Tutorial</h1>
<p>Definition of term</p>
</header>
<p> Hypertext Markup Language (HTML) is the standard markup language for documents designed to be displayed in a web browser. </p>
</article>
</body>
</html>
Or we can use the header tag to separate the top content of our webpage where we have our navigation bar and our website logo as shown below.
<! DOCTYPE html>
<html>
<body>
<header>
<a href = “#” > <img src= “logo.png” alt= ”logo”> </a>
<nav>
<a href = “#” >Home</a>
<a href = “#” >About Us</a>
<a href = “#” >Contact Us</a>
</nav>
</header>
<main>
<article>
<header>
<h1> HTML Tutorial</h1>
<p>Definition of term</p>
</header>
<p> Hypertext Markup Language (HTML) is the standard markup language for documents designed to be displayed in a web browser. </p>
</article>
</main>
</body>
</html>
As you can see, we have introduced so many new tags. In our next post, we will be taking these tags one after the other and discuss their functions.
Remember to drop your questions in the comment box.


[…] One thing we should observe here for now is the image tags, we have used most of the other tags here on our previous post. […]